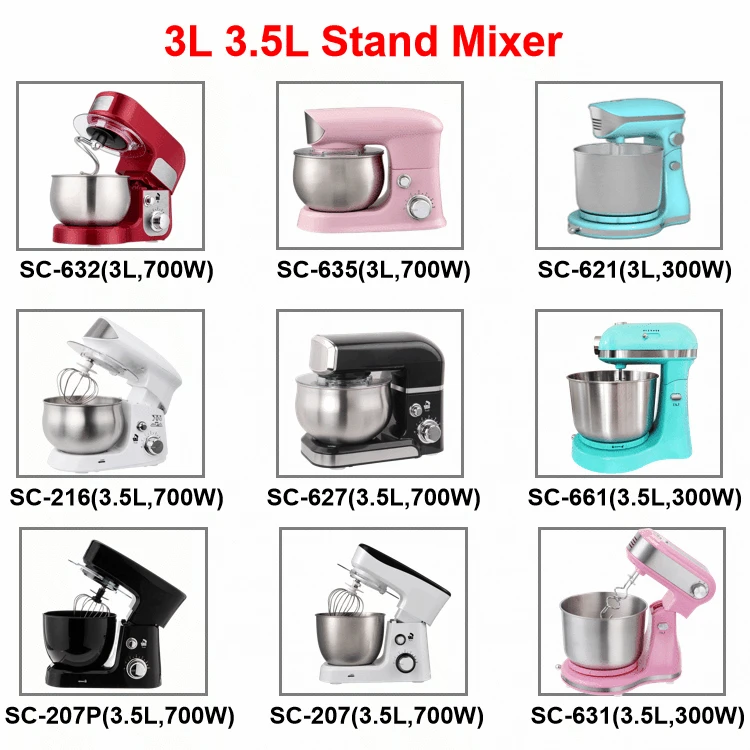
KitchenAid 4.5 Quart Ultra Power Stand Mixer Parts Diagrams

Not posted the battlestation on here for a while. I've made a few
Tip the mixer head backward and clean the underside with a damp cloth. If there is caked on food, use that dry toothbrush to scrape it away and wipe again with the damp cloth. While the mixer head is tipped back use a cotton swab to clean the round crevice for the beater shaft. If that area seems especially dirty use a mild dish soap or baking.

The 6 Stages of an Effective, Quick Decisionmaking Process
Hand wash parts with mild soap and hot water, sanitize, and dry fully before you reassemble your mixer. Clean the agitators, safety, splash guards, and the bowl after each use. Wipe the exterior, cradle, and the inside of the hub daily. It is essential to remove and clean the agitator after each use. Allowing material to build up on the.

Home NkrumahMandela Leadership Conference
The Mini Artisan measures 11¾ by 7⅜ by 12 inches (deep, wide, tall). By contrast, the classic Artisan mixer measures 13¼ by 8⅜ by 13¾ inches. If you really want a stand mixer, we suggest.
Household Low Noise Batidora 10l Commercial Dough Cake Mixer 3 In 1
Maintaining the functionality and longevity of your stand mixer requires more than occasional use. Just like any other piece of equipment, it needs regular cleaning and care to ensure optimal performance. In this blog, we will discuss the necessary steps to take in stand mixer maintenance. 1. Clean the exterior:

Klon Teller Banyan stockholm burberry Länglich Tansania Fort
The design of the stand mixer is a trademark in the U.S. and elsewhere. This online merchant is located in the United States at 553 Benson Rd, Benton Harbor, MI 49022. MSRP is the Manufacturer's Suggested Retail Price, which may differ from actual selling prices in your area.

Peloton launches three new app tiers as part of company rebrand TechRadar
The body of the mixer is also an important part of proper ingredient system mixer maintenance. Whether you have a ribbon mixer, paddle mixer, or another type of mixer, the body of the machine can be damaged if the agitator is too close to the walls. Foreign objects, such as bits of metal or small rocks, can also damage the mixer as it operates.

Which Of The Following Actions Is Legal For A Pwc Operator? All Answers
Step 5. Clean the interior - To clean inside the machine, you can remove the hub plate and wipe inside. Once dry, replace the hub plate securely. Step 6. Remove debris from ventilation shaft - This is also a good time to remove debris from the ventilation shaft with a small brush or appliance vacuum. Step 7.

Nice approves ‘gamechanger’ machine for donated livers Express Digest
Below are the top seven must-dos for a functioning mixer. 1. Oil the Moving Parts. Lubrication is key. You don't have to oil the mixer every day, but it's important to establish a schedule. Components like the sliding bowl height adjustor should be oiled twice per year.

All Out to Stop the Pipelines in Virginia Updates and Call for Support
Signs that your mixer needs to be adjusted: Your stand mixer is adjusted at the factory so that the flat beater just clears the bottom of the bowl. If, for any reason, the flat beater hits the bottom of. the bowl or is too far away from the bowl: you can correct the clearance easily. The beater hitting the side of a bowl lift mixer means that.

3 Examples On How Performance Support Tools Can Supplement Compliance
The necessary action as part of stand mixer maintenance is d. Disassembling to clean all food-contact surfaces. This is important because food residue can build up over time and can lead to contamination if not properly cleaned. By disassembling the mixer, you can access all the food-contact surfaces and clean them thoroughly to ensure food.

KitchenAid 4.5 Quart Ultra Power Stand Mixer Parts Diagrams
damage to the Stand Mixer. 6. Do not operate Stand Mixer with a damaged cord or plug or after the Stand Mixer malfunctions, or is dropped or damaged in any manner. Return appliance to the nearest Authorized Service Center for examination, repair or electrical or mechanical adjustment. STAND MIXER SAFETY W10712126A_Final.indd 3 11/18/14 11:42 AM
MANUAL 2
Turn the accessory counterclockwise to hook the accessory over the pin on the shaft. ASSEMBLING THE STAND MIXER. Lower the motor head: Slide the locking lever to the unlock position and guide the motor head down. 5 Make sure motor head is completely down, then slide the locking lever to the lock position.

Orbán's EU voting rights challenged “historic” petition in European
Cleaning Your Stand Mixer. Step 1: Make sure it's unplugged. Everyday Cleaning. Deep Cleaning Your Standing Mixer. Extra Mixer Cleaning & Maintenance Tips. Hand wash the attachments, especially the whisk. Your stand mixer can't stand up to too much water! Avoiding rust and corrosion is easy.

PPT Unit 22 Command PowerPoint Presentation, free download ID2923709
Fortunately, KitchenAid has excellent resource pages and is up-front about the fact that their stand mixers may, in fact, leak oil at some point. "The mixer is packed with enough solid grease to last the lifetime of the machine," KitchenAid's product help pages read. "When the mixer is used, the grease is distributed around the gears to.

Students learn firefighting techniques such as basic hose handling
Locate the hinge pin cover at the back of the stand mixer. Use a screwdriver to remove the hinge pin cover by gently prying it off. Once the hinge pin cover is removed, you can access the hinge pin. Tap the hinge pin out using a soft mallet or a wooden block. This will allow you to detach the mixer head from the stand.

Comparing Different Flow Adjustment Methods for Precision Flow Control
The most important action to take as part of. Maintaining a stand mixer is an important part of ensuring that it continues to work properly and efficiently. The most important action to take as part of. Skip to content. Search. Search. Close this search box. Facebook-f Youtube Twitter Instagram. FAQ;